Friday, May 25, 2012

Math Fact Tubs

The secret: FROSTING!

When I was in college, a professor of mine gave me an amazing tip.  She said to save frosting tubs and use them to store little centers or work stations.  


Around Christmas time, I sent out a school-wide email informing the teachers that I am collecting frosting tubs, and to send any of them my way. It was perfect timing, as third grade was just finishing up their Gingerbread Houses! I ended up getting about ten of them in all.  

---I would suggest having people clean them out first, because I spent a good chunk of time scraping frosting, but I took what I could get from nine year olds on a sugar high!-- 

I have done many things throughout the year with these frosting tubs... I love them because you can easily give them removable labels with index cards, they are small enough to sit at students' desks, and they are easily stored.

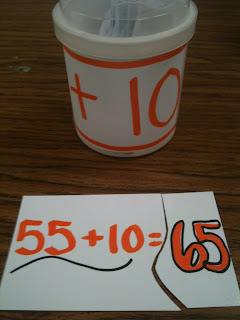
ANYWAY, what I used one tub for each set of math facts.  One for adding zero, one for adding one, one for adding two, one for take away one, take away two, and I even made some more challenging ones for my higher students such as adding ten, making ten, and doubles. Sometimes I just have a whole center based on one puzzle, or I let them take a tub back to their seat when they are finished with their work.  They have really proven to help sharpen their mental math skills this year, and the kids really enjoy using them.


For each set, I took several index cards (probably 15-20) and put a problem on the left side, then I wrote the answer on the right side.  I waited to cut them up until after I laminated them all, to save time and energy cutting all of the individual pieces.  I used different colored markers to make each set, so I could easily tell which set a piece belonged to in case one got misplaced.  I am really happy with the way these turned out!


Update:  I made a TON of literacy and math puzzles for frosting tubs available here for download!

Friday, May 4, 2012

Any takers?

Guess how long it took me to sharpen all these colored pencils?

...
.....
...
.......
...
......

A long time.

Tuesday, May 1, 2012

Objectives


I don't know how it is everywhere else, but many public schools in Arizona require you to write your "kid friendly" objectives on the board.

I added a little color to mine, even though the papers got caught in the laminator, so now they are a little wrinkled... (UGH the plastic that was going in fused with the plastic coming out, and it was a huge jumbled mess!)  But even so, I think its alright for this year.  

I especially like my SWBAT sign.  I used a sentence strip and mounted it on several colorful index cards.  Its awful psychedelic, don't you think?

Color Rings


These little gems are called Color Rings in my class.  They are leveled flashcards for advanced kindergarten.  My class started on an almond color ring that has all of the letters and color words.  In order to pass the almond ring and move on to the next, the student must name all letters and the corresponding sounds, as well as all of the color words.  They must be able to get through the whole ring with no mistakes in order to move on to the next. The rest of the rings cover a total of 240 sight words.  They keep the color ring at home and practice with their parents until he or she is confident that they will make no mistakes.  I will then test them on the particular ring. 


This is not a mandatory assignment, but It really gives them an advantage for first grade.  Plus, many Kinders jump at the opportunity to learn more sight words in a more structured way.

The color rings progress in this order:
  1. Almond
  2. Red
  3. Orange
  4. Yellow
  5. Green
  6. Blue
  7. Purple
  8. Brown
  9. Pink
For a full list of the words, plus the templates used for the flashcards email me at mmbrgr1@gmail.com

I'll post a picture of all of the color rings together later.