Showing posts with label DIY. Show all posts

Monday, August 5, 2013

Little desks

A few days ago, I bought dark wood colored contact paper, although I didn't know why. Meanwhile, my friend and coworker, Lori picked up these half boxes thinking I could somehow use them in my classroom. 


Lori has the best ideas, I swear! She says, why not make little desks out of these! They are perfect for first graders sitting on the floor with their legs stretched out in front of them! And with the wood contact paper (Dollar Tree) they look like real little desks! 


Here I am awkwardly smiling as I am putting the contact paper on one! Haha!


And here I am taping the edges so the contact paper won't come off.


They turned out so nice! I think the kids will really like them and they were really easy to make! We spent 10 minutes (and one dollar) to make each one! Very worth it!

If you are wondering about the box, I took a picture of the side of it side so you could see what it was (we didn't cut the box, it came like that).


Saturday, June 29, 2013

Lap Boards


Since I am doing alternative seating this year, I will only have table space for about 12 out of 20 kids.  *GASP!* Where will the other sit to do their work?!  Why the floor of course!

I took it upon myself to take a little trip to Home Depot last week to see what I could find to make my own lap boards (since I will not be buying anything fancy).  I asked an employee where I might find shower board, since I knew that that is what they used to make our white boards at school.


Here it is called "Thrifty White Panel Board.  Thrifty indeed!
I found the stuff, and at $13.65 for a board the size of one of our big white boards at school it was pretty cheap.

I explained to the employee that I needed these to make lap boards for school because I am a teacher (magic words, you'll find) and he was more than happy to cut them to whatever size I needed. Happy day!

He cut them 12 x 18 inches.  Even an adult could use these! :)


I got a solid 15 boards that were exactly 12x18, then an extra 5 more that were like a fraction of an inch off, then an extra little guy that I don't know what his dimensions are.  I'll be keeping 8 of them, and giving the rest to another teacher in my school.  Oh, and I'm sure this goes without saying, but they can be used as dry erase boards too.

Another thing worth mentioning...

At the Daily 5 conference that I attended last month, The Sisters said that having kids lie on the floor using a lap board to write works wonders for kids with underdeveloped fine motor skills.  These are typically the kids that have great gross motor skills (typically highly active boys) that try to use the larger arm muscles to make up for their little hand muscles.  The result is very sloppy handwriting and fleeting stamina.  Here is what they said to do:

Have the child use a lap board and lay them on their stomach with their paper and lap board out in front of them.  Have them prop themselves up on their elbows, and let them write like that.  This way, their elbow acts as an anchor, forcing them to rely on the smaller hand muscles that they clearly need to develop.

The sisters say that it may take a week or two, but they will progress so much faster than if they were sitting at a desk doing drill after handwriting drill.  Sounds good to me!


Thursday, June 27, 2013

Alternative Seating

So as I mentioned in a previous post, I got the OK from my principal to scrap my desk and chairs and use alternative seating.  I have been exploring the idea of it on the internet, and people are generally saying one of two things.  There is the first group (primarily made up of veteran teachers) that think it is crazy to ditch the desks for this new age practice, and a second group of teachers who have tried it, loved it, and have never even thought about going back to it.  Seriously, I have not even found a person who has tried it and hated it.  Sure, it is going to be hard to have to teach them to be able to do... everything... from literally anywhere in the classroom, and I'm sure that it will take a lot of time to teach the DOs and DON'Ts at the beginning of the year, but I am doing Daily 5!  A part of Daily 5 is teaching them how to be extremely independent and giving them a choice on what to do and where to sit (or lie, or stand, or crouch).

I have been doing a lot of research and I have many things that I want to try next year.  Unfortunately, the classroom that I am moving into is a lot smaller than the one that I am used to.  In fact, it is small by anyone's standards.  I was given the choice, and I actually chose this room though.


The room that I oh-so-professionally hi-lighted in yellow is my new room.  The room above it was my old room.  Needless to say, I am in a closet.  The problem is, is that when my school was being built, they never intended on having more than one teacher per grade level.  Well the numbers were higher than expected last year and they hired a couple of teachers to teach some combo classes.  This year, apparently the numbers have increased again because there will be TWO TEACHERS PER GRADE LEVELS!! I could not be more excited!!  It will be so awesome to bounce ideas off of someone that is teaching the same standards and going through the same grade level behavior drama!  As of now, they have not hired anyone to be my other half... but I did get an email telling me that they have given someone a second interview and they are considering hiring her!  I hope we get along!

Anywho, here is a list of the things that I'll be using as alternative seating:

X      exercise balls

X      couch cushions

X      t-shirt pillows (DIY)

X     bean bag chairs (DIY)

X     bucket seats (DIY)

X      crate seats (DIY)

X     PCV camp chairs (DIY)

X     Rugs, blankets, pillows, the usual...

These links will take you to the Pinterest pins that I got my inspiration from, but I haven't taken my own pics yet.  They will come soon!  Let me know what you think of my ideas!

Friday, May 25, 2012

Math Fact Tubs

The secret: FROSTING!

When I was in college, a professor of mine gave me an amazing tip.  She said to save frosting tubs and use them to store little centers or work stations.  


Around Christmas time, I sent out a school-wide email informing the teachers that I am collecting frosting tubs, and to send any of them my way. It was perfect timing, as third grade was just finishing up their Gingerbread Houses! I ended up getting about ten of them in all.  

---I would suggest having people clean them out first, because I spent a good chunk of time scraping frosting, but I took what I could get from nine year olds on a sugar high!-- 

I have done many things throughout the year with these frosting tubs... I love them because you can easily give them removable labels with index cards, they are small enough to sit at students' desks, and they are easily stored.

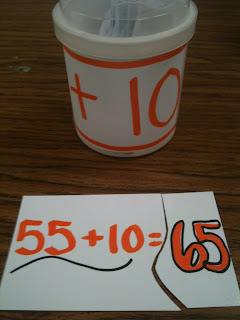
ANYWAY, what I used one tub for each set of math facts.  One for adding zero, one for adding one, one for adding two, one for take away one, take away two, and I even made some more challenging ones for my higher students such as adding ten, making ten, and doubles. Sometimes I just have a whole center based on one puzzle, or I let them take a tub back to their seat when they are finished with their work.  They have really proven to help sharpen their mental math skills this year, and the kids really enjoy using them.


For each set, I took several index cards (probably 15-20) and put a problem on the left side, then I wrote the answer on the right side.  I waited to cut them up until after I laminated them all, to save time and energy cutting all of the individual pieces.  I used different colored markers to make each set, so I could easily tell which set a piece belonged to in case one got misplaced.  I am really happy with the way these turned out!


Update:  I made a TON of literacy and math puzzles for frosting tubs available here for download!